Home > Validation > Drop Downs > Popup
FAQ - Data Validation Select Popup
Answers to frequently asked questions about the Data Validation Select Popup tool from Contextures.
Note: The DVSP tool is a free version of the popular DVMSP tool that I sold for several years. In the videos, screen shots and written steps, you might see "DVMSP", instead of "DVSP".
Code Doesn't Run
There are a few reasons why the code might not run:
- Macros are not enabled. To enable them, follow the instructions here: Enable Macros in a workbook
- The On/Off Cell was not set up. Read the instructions below, to fix the problem.
- The data validation drop down lists might not be set up correctly
NOTE: Be sure that your workbook shows letters in the column headings, and not numbers.
The DVMSP kit is designed to run in "A1" reference style (letters).
In R1C1 reference style (numbers in column headings), list items might not appear, for lists based on a formula, such as INDIRECT.
On/Off Cell
On the Customize sheet in the Setup file, you can enter a cell address, to use as an on/off switch, to prevent the macro from running occasionally. For example, you might want to edit the worksheet, without the listbox appearing. The steps below show how to:
- fix the on/off cell if it isn't working
- put the on/off cell on a different sheet.
Fix the On/Off Cell Code
If you leave the on/off setting cell blank, the popup list might not run correctly, because it looks for a range named "0" (zero), which does not exist.

To fix this problem, follow these steps:
- Right-click the sheet tab on your data entry sheet, and click View Code
- In the code, look for this line:
-
If Me.Range("0").Value <> "" Then GoTo exitHandler - Then, do either of these things:
- If you don't need an on/off cell, type an apostrophe at the start of the line, to change it to a comment, which will not run as a line of code
- if you DO want and on/off cell, replace the "0" with a cell address, such as "J3" -- then, use that cell as your on/off switch.


On/Off Cell Different Sheet
If you want to move the on/off cell to a different worksheet, follow these steps:
- Right-click the sheet tab on your data entry sheet, and click View Code
- In the code, look for this line (your code might show a different cell address, not J3):
-
If Me.Range("J3").Value <> "" Then GoTo exitHandler - In that line of code, replace "Me" with the name of your sheet, and change the Range to the cell address that you'll use for an on/off cell. For example, use cell A2 on the sheet named Admin
-
If Sheets("Admin").Range("A2").Value <> "" Then GoTo exitHandler
Error - Variable Not Defined
When you set up the data validation listbox in your own workbook, or in the Practice file, you might see an error, when you click on a data validation cell. "Compile Error: Variable not defined."
In the background, the VBA code is showing, and a word is highlighted.

To fix the problem,
- Click OK, to close the error message
- In the Visual Basic Editor, click the Run menu
- Click the Reset button, to stop the code from tring to run.

- Click the Tools menu, then click the References command.

- In the References window, scroll down to find Microsoft Forms 2.0 Object Library, and add a check mark to it.
- Click OK, to close the References window.

- Close the VBA window
- Save the Excel file, then close and re-open Excel, and open the file
- The code should work correctly, without showing the error message.
Data Validation Settings
Before you add the data validation multi-select code, you must add drop down lists in the cells on the data entry worksheet. The lists must be based on named ranges, which are Workbook level.
In the screen shot below, you can see the Month column's data validation list, which is based on the named range, MonthList.

In the next screen shot, the Name Manager (on the Ribbon, Formulas tab) is open, and the MonthList is highlighted.

List Closes After Selection
In columns that are set up for single selection, the list will close automatically, after you make a selection. If you would prefer to keep the list open, follow these steps to change that setting:
- In Excel, press Alt+F11 to open the Visual Basic Explorer (VBE)
- At the left, find your workbook, and click the + symbol to see the Excel Objects and Forms
- Click the + at the left of the Forms folder
- Right-click on frmDVList, and click View Object
- Right-click on the listbox (the big white rectangle), and click View Code
- Type an apostrophe at the start of the line: "cmdOK_Click". That will change the code to a comment, so it won't run.
- Click the Save button, at the top left of the VBE window.
- Close the VBE window.

Move After Selection
By default, when you click the Cancel button, the cell below is selected. You can change that setting in the popup form's code
- In Excel, press Alt+F11 to open the Visual Basic Explorer (VBE)
- At the left, find your workbook, and click the + symbol to see the Excel Objects and Forms
- Click the + at the left of the Forms folder
- Right-click on frmDVList, and click View Object
- Right-click on the Cancel button, and click View Code
- Look for the line in that procedure to move the selection when the form is closed:
ActiveCell.Offset(1, 0).Activate 'move down one row
- Change the Offset numbers, to set the number of rows down, and columns to the right, that you want to move. For example, Offset(0,1) will move down zero rows, and 1 column to the right.
- NOTE: If you do not want the selection to move, type an apostrophe at the start of that line. That changes the line to a comment, instead of code that will run.
Popup List Position
In the DVMSP Setup file, you can turn the Form Positioning on or off, in the Customize the Code - Advanced step.
- If you select Yes, the code in the Popup List tries to position the top left corner of the form in the center of your Excel window.
- If you select No, the form should appear in the center of your Excel window.

Move the Form After It Opens
If the Popup List opens with its title bar off the screen, follow these steps to move it:
- On our keyboard, press Alt, and tap the space bar
- Press the Enter key, to select the Move command, in the popup menu that appears
- Press the Arrow keys, to move the Popup List, down, left, right or up
- Press Enter, or click on the Popup List, to complete the move.
NOTE: You can also press the Esc key to close the Popup Form.
Adjust the Form Positioning
If the Popup List is not appearing in the correct position, you can change the Form Positioning to "No", by following these steps:
- Right-click the sheet tab, and click View Code.
- Scroll down a bit, to the section that has a comment "where should code run"
- Just below that (around line 25), you'll see the variable for the form positioning: bPos = True
- To turn off the positioning, change the True to False
- Then click the Save button at the top left of the screen.
Popup List Form Positioning Code
If that doesn't fix the problem, there is also Form Positioning code in the Initialize procedure for the frmDVList. You can make an additional change to the code there.
Here is the default code, which puts the top left corner of the form in the center of the Excel window, if form position is "Yes". For "No", it tries to center the form in the Excel window
If bPos = True Then
   Me.StartUpPosition = 0
   Me.Top = ActiveWindow.Top _
            + ActiveWindow.Height / 2 _
            - Me.Height / 2
   Me.Left = ActiveWindow.Left _
            + ActiveWindow.Width / 2 _
            - Me.Width / 2
Else
   Me.StartUpPosition = 1  'center owner (center in Excel window)
End If
If the StartUpPosition 1 isn't working, try one of the other options that Excel offers
Me.StartUpPosition = 2  'center on the screen
OR
Me.StartUpPosition = 3  'upper-left corner of screen
Make the List Wider or Taller
After you add the popup list to your workbook, you can adjust the popup form, to make it wider.
To see the UserForm that contains the popup list:
- Press Alt + F11 to open the Visual Basic Editor (VBE)
- At the left, in the Project Explorer, find your workbook, and click the + at the left of the Forms folder
- Double-click on the UserForm named frmDVList

To make the UserForm and list wider,
- Click on the form's border, or click somewhere on the grey background.
- Point to the handle at the centre of the right edge, and drag to the right, to make the form wider.
- Then, click on the ListBox that is on the UserForm, to select it
- Drag the handle on its right side, to mke the ListBox wider.
Then, click the Save button, and close the Visual Basic Explorer, to go back to Excel.

To make the UserForm and list taller,
- Click on the form's border, or click somewhere on the grey background.
- Point to the handle at the centre of the bottom edge, and drag down, to make the form taller.
- Next, use the pointer to drag over the buttons, to select all of them
- Drag the buttoms down to the bottom of the form
- Then, click on the ListBox that is on the UserForm, to select it
- Drag the handle on the bottom, to mke the ListBox taller.


NOTE: You might need to adjust the list or button sizes after changing the font size
Then, click the Save button, and close the Visual Basic Explorer, to go back to Excel.
Change the Setup Options
After you add the DVMSP popup form and code to your workbook, you might want to change the way that it's working. For example, maybe the popup form is single selection in every column, and you want all the columns to show a multi-selection popup.
Here's how you can choose different setup options, and get the new options into your workbook.
DVMSP Setup workbook
- First, open the DVMSP Setup file
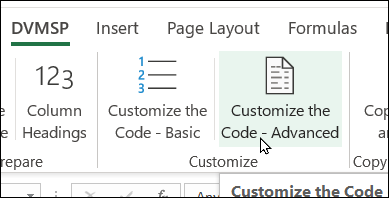
- At the top of Excel, click the DVMSP tab
- Click the Customize the Code - Basic button

- On the Customize sheet, choose the new settings that you want to use.
- For example, if you want all the popups to allow multi-selection:
- Click the arrow for the Single Selection option,
- Choose No cells on worksheet

- Next, go back to the DVMSP tab, and click the Customize the Code - Advanced tab.
- On the CustomizeB sheet, choose the new settings that you want to use.
- For example, if you type a cell address in the On/Off Cell option box

Copy the Code
Next, follow these steps to update the code in your existing workbook – make a backup copy of your workbook first:
- Open your workbook, where you added the DVMSP popup form and code
- In the DVMSP Setup file, go to the “CopyCode” sheet (it’s after the “CopyTheCode” sheet)
- At the top left of that sheet, near cell B7, click the “Copy Code button”

- Go to the workbook where you added the DVMSP popup
- Right-click on the sheet tab where you added the popup.
- Click View Code, to open the VBA window
- NOTE: These instructions assum that the Popup code is the only thing on this worksheet module – it starts with “Private Sub Worksheet_SelectionChange(ByVal Target As Range), and goes down about 75 lines, to “End Sub”
- Click anywhere in the code, and press Ctrl+A, to select all of the code
- Press Delete, to remove it
- Press Ctrl+V to paste the code that you copied from the DVMSP Setup file.
- Press Ctrl+S, to save the workbook
- Close the VBA window
- Test the popup on your data entry sheet
Change Font Size
After you add the popup list to your workbook, you can adjust the font size used in the list or on the buttons, to make the font larger or smaller.
To see the UserForm that contains the popup list:
- Press Alt + F11 to open the Visual Basic Editor (VBE)
- At the left, in the Project Explorer, find your workbook, and click the + at the left of the Forms folder
- Double-click on the UserForm named frmDVList
- Next, click on the control (list or button) that you want to change.
- Tip: To select multiple controls, click on one, then Ctrl+click on others
- In the Properties window, scroll down to the Font property, and click in the box.
- Click the 3-dot button that appears at the right side of the box
- In the Font dialog box, select the font settings that you want, then click OK

Then, click the Save button, and close the Visual Basic Explorer, to go back to Excel.
Separators
In the DVMSP_Setup file, there are several built-in options for separators, and you can select any of those. Also, there is a sheet with a list of separators (Lists_Sep), where you can change any of the existing options, or add new options. The range of cells with the thick border is a named range, so be sure to insert your new item within that range.
NOTE: Select a Separator that is not included in the items of your list. For example, if your items contain a comma or a hyphen, do not use those as separators.

Double-Click to Open the List
The kit is designed to open the list automatically, when you select a cell that has a data validation drop down list. Because the worksheet code runs every time a cell is selected, that can slow down a large, complex workbook.
To speed things up, you can make a couple of changes to the code, so it only runs when you double-click on a cell that has a data validation drop down list.
(Optional) Add Delay to UserForm code
Change the Worksheet Code
Follow these steps to make the changes:
- On the sheet where you pasted the code, right-click the sheet tab, and click View Code.
- At the top of the code module, click in the blank row above the Private Sub Worksheet_SelectionChange line

- At the top right of the window, click the arrow in the Procedures drop down, and click on BeforeDoubleClick

- Select from the End Sub line, down to the Private Sub Worksheet_SelectionChange line
- Delete those lines

- Scroll down a bit, to the first "Select Case Target.Column" section
- Click in the blank line above that section
- In the blank line, type: Cancel = True (that turns off the default double-click action, such as entering the cell to edit it)
- Then, click the Save button, at the top right of the Visual Basic Editor (VBE) window.
- Close the VBE window

(Optional) Add Delay to UserForm Code
Using a double-click can result in one or two items being accidentally selected when the list opens. This occurs if the popup list opens over the cell that was double-clicked.
To prevent this from happening, follow these steps to add delay code to the UserForm that contains the popup list. This locks the list for one second when the form opens, so items are not accidentally clicked.
- In Excel, press Alt+F11 to open the Visual Basic Explorer (VBE)
- At the left, find your workbook, and click the + symbol to see the Excel Objects and Forms
- Click the + at the left of the Forms folder
- Right-click on frmDVList, and click View Code
- Scroll down about halfway, to find the Initialize section:
-
Private Sub UserForm_Initialize()
- Scroll down, past the list of "Dim" statements, and the"On Error Resume Next" line
- Click in the blank line just below that, and press the Enter key, to start a new line.
- Copy the following code, and paste it into the new line. This code locks the list, waits one second, then unlocks the list. This is the shortest delay time possible.
-
Me.lstDV.Enabled = False Application.Wait (Now + TimeValue("00:00:01")) Me.lstDV.Enabled = True - Click the Save button, at the top left of the VBE window.
- Close the VBE window.
Formatted Numbers in ListboxIf one of the drop down lists has times, such as 1:00 PM, 2:00 PM, etc., the tiems might appear as decimal numbers in the DVMSP listbox.
Fix Number Format ProblemTo prevent this from happening, follow these steps to add number formatting code to the UserForm that contains the popup list. You'll replace one section of the old code, with new code First, MAKE A BACKUP of your workbook, before changing the code.
Private Sub UserForm_Initialize()
  If Not rng Is Nothing Then
    For Each cList In rng
       Me.lstDV.AddItem cList.Value
    Next cList
  Else
      If Application.International(xlListSeparator) = ";" Then
        strDVList = Replace(strDVList, ";", ",")
      End If
      vArr = Evaluate("=" & strDVList)
      '2016-10-05 handle one-cell lists
      If IsArray(vArr) Then
        For lIndex = LBound(vArr) To UBound(vArr)
          Me.lstDV.AddItem vArr(lIndex, 1)
        Next lIndex
      Else
        Me.lstDV.AddItem vArr
      End If
  End If
|

  If Not rng Is Nothing Then
    For Each cList In rng
''2022-12-04 handle time formatting
       Me.lstDV.AddItem _
          Format(cList.Value, cList.NumberFormat)
    Next cList
  Else
      If Application.International(xlListSeparator) = ";" Then
        strDVList = Replace(strDVList, ";", ",")
      End If
      vArr = Evaluate("=" & strDVList)
      '2016-10-05 handle one-cell lists
      If IsArray(vArr) Then
        For lIndex = LBound(vArr) To UBound(vArr)
''2022-12-04 handle time formatting
          Me.lstDV.AddItem _
            Format(vArr(lIndex, 1), _
              vArr(lIndex, 1).NumberFormat)
        Next lIndex
      Else
        Me.lstDV.AddItem vArr
      End If
  End If
|
Hide ALL Button for Single Select
The form has an ALL button that will select all the items in the list. If you want to hide the ALL button for single selection columns, follow the steps below:
Find the code:
- In Excel, open your workbook, and press Alt+F11 to open the Visual Basic Editor (VBE)
- In the project list at the left, find your workbook
- If necessary, click the + signs to see the forms in your workbook
- Right-click on frmDVList, and click View Code
Add a new line of code:
- In the drop down list at the top left of the code window, select UserForm
- In the drop down list at the top right of the code window, select Initialize
- Scroll down a bit (about line 160), where you will see this line:
- Me.lstDV.MultiSelect = lMS
- Click at the end of that line and press Enter, to create a new blank line
- In the blank line, put this line of code:
- Me.cmdALL.Visible = lMS
Save the changes:
- To save the changes, click the Save button at the top left of the VBE window
- Close the VBE window
Stop New Items from Sorting
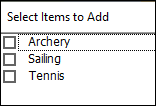
If you click the New button in the Data Entry Popup form, and add a new item, you'll see that item at the bottom of the existing list.

However, the next time you open the Data Entry Popup form, the items have been sorted, A-Z.
To stop new items from sorting automatically, follow the steps below:
- Press Alt+F11 top open the Visual Basic Editor
- Find your workbook in the Project Explorer list, at the left
- Click the + sign to see all the forms
- Right-click the OK button, and click View Code
- In the code, scroll down about half way, to find the line that starts with "rng.Sort". This is just abofe the exitHandler section.
- Type an apostrophe at the start of that line, to change it to a comment.
- Then, click in the blank row above, and the comment text should turn green.
- Then, click the Save button, and close the VBE window

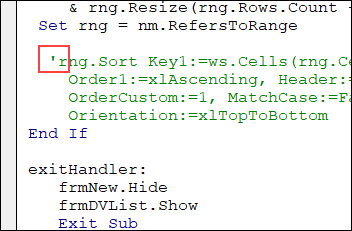
The Sort code that was changed to a comment will not run now, so the new items will stay at the end of the lists.
Compile Error - Ambiguous Name
The kit is designed for workbooks that do not have any existing macros on the worksheet. If you add the code to a worksheet that already has a Worksheet_SelectionChange procedure, an error message will appear when you click any cell on the worksheet.
Compile error: Ambiguous name detected: Worksheet_SelectionChange
This can happen if you change the setup options in the DVMSP Setup file, and then add the code to the workbook again.

Avoid the Problem
If you want to make changes to your DVMSP setup options, delete the old code from the data entry sheet first.
- To see the code, right-click on the sheet tab of your data entry sheet, and click View Code.
- Scroll through the code, to see what is there. The DVMSP kit adds "Option Explicit" at the top, and a procedure named Worksheet_SelectionChange. That procedure has a comment at the top, "'show Listbox when a data validation cell is selected "
- If that's all that is on the code module, press Ctrl + A to select everything, then press the Delete key to clear the sheet.
- If there are other procedures on the code module, do not delete those.
- Then, go to the DVMSP Setup file, make the changes to your customization options, and click the button to copy the code into the new workbook.
Fix the Problem
If there are duplicate procedures on your data entry sheet, follow these steps to try to fix the problem.
- To see the code, right-click on the sheet tab of your data entry sheet, and click View Code.
- Scroll through the code on the sheet, to find the two procedures that are named Worksheet_SelectionChange.
- Check the code in each procedure, to see if it is from the DVMSP kit -- that procedure has a comment at the top, "'show Listbox when a data validation cell is selected "
- Before you change the code, make a backup copy of your file.
- If both copies of the Worksheet_SelectionChange procedure are copies of the DVMSP code, press Ctrl + A, to select everything, then press the Delete key to clear the code module. If there is non-DVMSP code on the sheet, see the section below.
- Then use the DVMSP Setup file to customize the code, and to install it again.
Combine With Existing Code
If the other copy of the Worksheet_SelectionChange procedure has non-DVMSP code in it, you would need to combine both the DVMSP code and the non-DVMSP code into one Worksheet_SelectionChange procedure.
This kit does not include assistance for modifying your existing code. You will need programming skills, or help from a programmer, if you plan to integrate the DVMSP code with existing code on the data entry sheet.
Excel Hangs or Crashes
If Excel hangs or crashes when the popup list opens, the problem is usually caused by the named range where your list of items is stored. If that named range includes an entire column, that's over a million rows, and the popup list can't process that many items, so it hangs or crashes.
If possible, keep your list in a named Excel table, and the list will expand or shrink automatically, if you add or remove items. You won't need to include any blank rows at the end of the list, for future additions.
No Items in Popup List
If the popup list does not show any items, it's usually because the macro can't understand the name that was used for the cell's drop down list.
This can occur if the cell uses the INDIRECT function to create a dependent list. This feature works when the column headings are letters (A1 ref style), but does not work if the column headings are numbers (R1C1 ref style). Be sure to use the A1 Ref Style when using the INDIRECT function for your drop down lists, to avoid this problem.
DVSP Help Pages
There is no technical support provided for the DVSP tool. Use the tool as is, and at your own risk.
For more tips and instructions, visit the following pages:
-- Data Validation Select Popup page
Related Tutorials
Last updated: December 12, 2024 1:38 PM